Soooo, It’s Been Awhile

Hello, my people!

So, it’s been about five-six years since I’ve posted to this blog. I’ve logged in a few times over the years in an attempt to say hello, but I just stared at a blank screen and eventually gave up.

While I haven’t cooked as much over the years, I have been baking. I love cookies and baking A LOT and I turned that love into a home-based baking business. It’s been five years (I can’t believe it!) since Yalla Sweets came to fruition. And while I haven’t been as active with YS (are we seeing a pattern here??) as of late, it is always on my heart – just like this blog has been.

I know this year has been a super weird cluster of experiences many of us haven’t faced before. At the beginning of it, I baked and cleaned a ton. I figured it would be a good way for me to reconnect with my cookies and my obsession with food. And, it was for awhile until it wasn’t.

After having a conversation with a friend recently, I was reminded of Zayt and Zaatar and how much I loved this project. When I started this blog, there were only a few cookbooks that focused on Palestinian food/food from the Levant region. I’m so thrilled and proud to say that over the last decade, we have seen a number of gorgeous Palestinian cookbooks published. I love seeing the stories, memories, and recipes from other Palestinian food lovers. I especially love that our food is preserved in writing for others to learn about and appreciate.

I share all of this to say, I’m back! Zayt and Zaatar started as a personal project that allowed me to reconnect with the memory of my mama through learning and cooking her recipes. It was a powerful moment in my life and I hope that the stories resonated with those who took the time to read. I hope the recipes were made and shared with those you love (and turned out okay!).

Moving forward, I’m just going to write. I’ll write about food. I’ll write about cookies. I’ll write about baking. I’ll share recipes when I feel excited to share. I’ll write about memories around food. I’m not going to hold myself to a theme. I just want to write.

I’m going to give myself the grace to ease back into this and if there is a recipe you’d like to see or a food/baking-related topic you’d like me to touch on – feel free to leave a comment and ask!

Quinoa Mjaddarah (recipe included)

Mjaddarah is a very popular dish in the Middle East. It’s incredibly easy to make, inexpensive, and the perfect vegetarian/vegan option for folks. My mama made it often because it took very little effort to make and an hour in the kitchen generated enough food to feed 20 people for a week. That fact was a huge selling point for my mama. For me? Not so much. I didn’t enjoy eating the same thing five times a week, but boy do I appreciate leftovers now!

Mjaddarah is usually made with rice and lentils, but I don’t eat white rice much these days and I’m not a fan of brown rice. That being said, I have been without my (now) beloved Mjaddarah for quite awhile. It has become one of my favorite comfort foods over the years. Where once I turned my nose to this dish, demanding instead something terrible for me like a cheeseburger or boxed mac and cheese, now I crave Mjaddarah often.

quinoa mjaddarah

My dad came up with the genius idea of switching out the rice for quinoa. While I love quinoa, I was initially skeptical of the healthier substitution. I gotta say, the starchy yumminess of the  rice in this dish is what makes me feel so warm and cuddly when I indulge. I wasn’t sure quinoa would have the same effect. Rest assured, my dad’s recipe is just as comforting as my mama’s. And this one is better for you!

Ingredients
8 oz. (1/2 bag) brown lentils
1 1/3 cups dry quinoa
2 cups of water (plus more for cooking)
2 tablespoons of finely minced onion
1 tablespoon cumin
1/8 teaspoon garlic powder
A pinch of curry powder
Salt and pepper to taste
Directions
1. Using a shallow pan or bowl, rinse out lentils to clean any excess dirt or unwanted debris.

2. Put quinoa in a very fine sieve and fill up a large bowl with mildly hot water and place the sieve inside the bowl. Change the water in the bowl every five minutes. Do this two or three times over a 15-minute period to get the quinoa cleaned. It is, more importantly, used as a method to par-cook the quinoa before mixing with the lentils.

3. Meanwhile, pour two cups of water into a medium pot and add the lentils. Cook on high heat until it starts to boil. Once boiling, switch to medium heat and simmer for 10 minutes.
4. Take the sieve with the quinoa out of water and let it drain before adding to the lentils. At this stage, add all other ingredients. Also, add either water (or reduced-sodium chicken broth for added flavor) until it just covers the lentil/quinoa mixture and turn up the heat until it boils.

5.Once boiled, turn to low-medium heat. Simmer for 12-15 minutes. Check at 10 minutes to see if water has absorbed. Turn off heat once absorbed and leave lid on until ready to eat. Serve with fried onion and cucumber-tomato salad.

You can find the traditional recipe for Mjaddarah, as well as recipes for the fried onions and cucumber-tomato salad,  here.

Comment below and let me know what you think of this healthier version! If you make the recipe, feel free to tag me on Instagram (@yallasweets) and share your food pics and thoughts!


Home is Where the Heart Is

Happy 2016, everyone!

I have been baking away since the holidays and working on getting a little more creative with my cookie recipes. I’m finally getting to a place where I feel much more confident in my abilities as a baker, and that means there’s more room for adventure in what and how I bake.

I’ve also been thinking a bit about cooking in general. I don’t cook savory dishes as often as I used to, and I’m finding that I miss it a great deal more than I realized. I think I’m missing it because I miss being a more nurturing person. Food is a really authentic, heart-centered way to share your love and compassion with others. I certainly do that with my baking, but I just miss cooking. People always have to eat whole foods; they don’t necessarily always have to eat a cookie. (Though, I’m happy to argue the latter point ’til the cows come home.)

Thanks to a recommendation from a friend, I started watching episodes of “The Mind of a Chef” on Netflix. It’s a FANTASTIC show on PBS that follows the philosophies and work of some of the most inspiring and talented chefs in the country. And I am HOOKED. You are transported to a world where you can watch people cook, listen to their stories, delve into the whole world of farming, history, food science, and innovation. It’s utterly fascinating to me. It teaches you, once again AND if you’re listening, how interconnected we are in this world. Food, literally, is life. And for those of us who are passionate about it, food speaks stories, fuels bodies and minds, and serves as a medium for expression and revolution.

The third season (Episode 5 to be exact), takes you to Kentucky, where Chef Edward Lee lives and cooks. I was most struck by a conversation he had with another local chef, Chef Ouita Michel as they cooked together a dish with local ingredients. They discussed the idea that newer chefs that only have restaurant experience versus learning the tricks of the trade from home cooks and incorporating that into their culinary narrative are at a disadvantage. Chef Michel eloquently stated that, “Restaurants don’t define the food community in the United States.”

Now, I had been binge-watching this series all day while I baked for a client and those words made me stop what I was doing, sit down, and listen to the conversation with intent. Being the person I am, I struggle with the fact that I am not a professionally-trained maker of food and desserts. And while I honestly have no interest in being a world-renowned pastry chef, I feel like other people NEED me to be one in order for my work to have real merit. But, her words gave me freedom and reminded me that food is home and it doesn’t really matter where good food gets made.

One of the major threads I see woven into each one of these chef’s stories is how the food they grew up eating influences the food they cook today. I suppose it’s hard to separate the two. The food of your family is where you learned what you liked and what you didn’t like. If you were fortunate enough to come from a family where at least one of your parents, probably your mama, was cooking real food, you probably have a strong memory connection to the foods of your childhood. Use that. Don’t ever let those memories go. Use them to learn more about the food you grew up eating. Use it to comfort you in the moments when you need a hug from someone you love, but don’t, in that moment, have access to them for whatever reason. Food almost always tastes better when someone you love is cooking it for you, but there is immense comfort in being able to cook it for yourself, too.

I didn’t appreciate this enough when I was a kid, but I am SO unbelievably grateful that my mother (and father) inadvertently taught me the value of shopping for and making a meal. I get it now and it has fueled every aspect of this blog and my cooking/baking journeys.

So, I think I’m going to get back to trying out new savory recipes and documenting those experiences here. I have a few ideas in mind, but nothing concrete yet. I’ve just been studying and reading the topic of food for so long now that I want to get out of the theoretical and into the kitchen.

Stay tuned!

Holiday Menu!

The holidays are here! And you know what that means, right?

Cookies!!

I’ve put together a Holiday Menu that offers a ton of gift-giving ideas! Options include a variety of cookie tins, decorative jars of spiced walnuts, and gift certificates.

There are also plenty of catering options  for your upcoming holiday gatherings, office holiday parties, dinner parties, school functions, etc.

If you’re looking for thoughtful + yummy gifts, cookies made with lots of love are definitely the way to go!

HolidayMenuYA2015


The Menu

Hi Y’all! It’s been a year since I committed to the idea of Yalla Sweets and I wanted to share with you all the culmination of that work. Here’s the first ever Yalla Sweets menu (just in time for the holidays)! This menu is a testimony to this blog and the years I spent learning to cook and bake and reconnect with the memory of my mother and the food I grew up eating. It’s a combination of nostalgia and Middle Eastern-inspired treats that are MY nostalgia. It is my goal and hope that these sweets bring you and the people you share them with real joy. YS-Menus_WEB

How To Make: Vanilla Sugar

Vanilla Sugar Here’s a fun fact: I once paid over $10 for a teeny, tiny jar of lemon-infused sea salt flakes because I was hoping they’d inspire a new cookie recipe. That teeny, tiny jar of flavored salt has been sitting, unopened, in my pantry. I guess I’m still waiting for that bolt of inspiration.

What was the point of telling you that story? Well, you know how you walk into a specialty shop and see all sorts of interesting jars of artisan condiments or small batch bottles of jams or extracts? You’d be surprised to learn you can make a lot of those things at home.

I have been trying to find subtle ways to up my cookie-making game, and using good quality vanilla seems to be a great place to start. I figure, if adding a little extra pure vanilla extract to my baked goods can make such a huge difference in flavor, imagine what infusing sugar with vanilla would do!

Vanilla sugar looks and sounds fancy and complicated, but it’s really neither of those things. What it IS, is a great way to add subtle, sweet vanilla flavor into certain baked goods, your morning coffee, fruit, cinnamon sugar toast, homemade whipped cream, cocktails, and so much more! It’s a fun and easy way to get a lot of use out of a rather expensive little bean.

There are different types of vanilla bean/extracts. I happen to prefer the Madagascar Bourbon variety because the bean produces a sweeter, creamier flavor. Its vanilla flavor is straightforward and pure. It works great for baked goods that just need that little extra something to complement the other flavor notes in your recipe. If you’re looking to infuse your homemade vanilla sugar (or extract) with a more pungent, bold flavor you can opt for using Mexican or Tahitian vanilla.

Middle Eastern dessert recipes don’t typically utilize vanilla, but I’m all about changing that up and can’t wait to experiment with vanilla sugar.

How would you/do you use vanilla sugar in your cooking/baking? I’d love to read more about the unique ways you use this special condiment.

Vanilla Sugar

Ingredients:

1 3/4 – 2 cups of granulated sugar

1 vanilla bean pod (I used a Madagascar Bourbon bean from Rodelle because they were on sale at my local grocery store. My preference is NielsenMassey.)

Directions:

  1. Measure out 1 3/4 – 2 cups of granulated sugar. (This really depends on the size of the glass jar you are using. If you have a bigger jar and want to use more sugar, try to keep the ratio at 1 vanilla bean to every 2 cups of sugar.)
  2.  Take a small paring knife and cut the vanilla bean lengthwise in half. Using the back of your knife, scrape out the seeds from the entire bean and place the seeds in the bowl with the sugar.
  3. Using a fork or a whisk, evenly distribute the vanilla bean seeds throughout the sugar. You’ll see lovely little specks of vanilla all throughout.
  4. Take the remaining vanilla bean pod and place it inside the jar.
  5. Using a funnel, pour the vanilla sugar inside the jar.
  6. Put the cap on tight and store the vanilla sugar in a cool, dark place for at least two weeks before using.
  7. Use and enjoy!

Note: Vanilla sugar (including the vanilla bean pod) has a pretty long shelf life. So, don’t worry about removing the pod after you’ve let the sugar and vanilla do their thing.

Birthday Wishes

mama

There’s no recipe sharing today, y’all. I wanted to take a few minutes to ramble away about this day and the woman that inspired this blog project and my future livelihood.

Today would have been my mama’s 61st birthday. My dad and I were reminiscing earlier today, and we both wondered aloud about what kind of woman my mother would have become had she been given the opportunity to beat cancer for good and live a more authentic life – one that wasn’t filled with fear and holding back.

She was an absolutely beautiful woman. I don’t say this because I have half her DNA and she gave me life; my mother was truly stunning. I’m not sure she realized her beauty, but her lack of awareness in that area didn’t change the fact that she was genuinely beautiful – both inside and out. She was incredibly hard on herself – a trait I picked up and haven’t quite been able to let go of just yet.

She was a good mother. And it has taken me a really long time to say that again. I spent a whole lotta years focused on the hurt and anger and frustration surrounding her illness and her death, and it took away from my ability to see my childhood in a more objective way. Though, I suppose childhood memories are one of those things that are meant to be a bit more subjective…

Anyway, a significant reason why I started this project all those years ago was to reconnect with the memories I had of my mama that were positive and nurturing and loving. Her cooking and baking have always provided comforting memories for me. I remember how hard she’d work to make us nourishing meals and I thought that if I taught myself how to cook her food, I’d be able to let go of the pain and the hurt and live my way into loving and appreciating her again.

Well, I’ve learned to make lots of yummy Palestinian food over the years, and I’m really in love with the fact that I am able to make the dishes I grew up eating. I still wish my mother was here to make them for me on occasion, but the next best thing is putting my love and soul into cooking and baking the food of my family, for my family.

It’s been 24 years since I lost my mother, and I am finally, FINALLY, in a place where my love for her outweighs my grief for her. Instead of focusing on the loss, I’m able to remember once again why I was so lucky to have her in my life for the brief 13 years that I did.

Her name was Nawal. She had a soul more vibrant than most people I know. She had one of those deep belly laughs – the kind that let you know she meant it when she laughed out loud. Her eyes sparkled with love, but, if you looked deeper, you could see there was a whole other person waiting inside of her to come out. She didn’t get the chance to reach her potential as a human being; as a woman; as a mother; a wife; a friend. I know, from the depths of my soul, my heart, that had she been able to live more freely, without the fear and anxiety of life, of family bullshit, of illness, she would have been unstoppable.

I understand now that I can’t live her unlived life. I can’t pick up where she left off or mend for her all the things she needed to sort out before she left this world. I tried, but it just isn’t my story to end.

My story is just beginning. At almost 38, I am finally beginning to understand what it means to live my best version of a life. It looks a lot like my kitchen does after I bake something – a complete and utter mess. (Have I mentioned I’m not exactly the tidiest of bakers?) But, that mess serves a valuable purpose. It’s one part of a whole. It’s the precursor to something sweet and satisfying that was made with my two hands and a little bit of my soul. It’s my way of reconnecting to my capability to love and nurture others. It’s one of those full circle kinda things, ya know?

So, with all these ramblings aside, I just really want to say: Happy Birthday, Mama. I love you.

Sesame Candy (Recipe Included)

It’s my belief that almost everybody has one or two (or ten, if I’m being really honest here!) types of candy that evoke some major memories from childhood. It’s not necessarily the candy you loved eating the most, but the candy that you associated with the people you loved the most.

For instance, one of my favorite uncles, one of my father’s brothers, always had these super minty blue candies in his candy dish. A quick search leads me to believe that those little candies were the Brach’s Ice Blue Mint Coolers, and I LOVED them. I’m not sure I loved them because they reminded me of my uncle or because peppermint has always been one of my favorite flavors. Heck, for all I know, it’s those candies that helped developed my flavor palate. One thing is for certain though, whenever I see these candies somewhere I am instantly transported back into his quirky little home amongst my loving family.

My grandmother used to keep these gorgeous individually wrapped chocolates inside a wooden candy bowl that was hidden inside one of her crowded cupboards. She’d bring them out on two occasions: to surprise me or whenever I asked for one (which was often). I have been searching for these chocolates for years, and I still have no idea where she got them. They were wrapped in blue and purple and red and orange crinkly metallic wrappers (if memory still serves me correctly) and the chocolate inside was subtle and never too sweet. They weren’t like the Hershey’s bars I grew up eating. They were made with what seemed like less sugar and tasted slightly sweet but mostly bitter from the subtle cocoa flavor. Some were shaped like triangles, others like rectangles with chopped nuts inside. The texture was almost crumbly, but that could’ve been from how long they were sitting around. I’m not gonna lie, I kind of love old chocolate that has gotten a little powdery over time. And I’m sure those chocolates are the exact reason why I love a slightly strange variation on chocolate.

Now, my mother always had sesame candy in our home. If I think about it, a lot of my family members had sesame candy on hand. It is a pretty neutral candy. It’s not the almighty chocolate, but, let’s face it, it’s not a peppermint candy either. Let’s say it falls somewhere in the middle of our candy spectrum. I’ve always loved the way it tastes, but it was never my go-to candy (please note that this fact has, literally, never stopped me from eating it when I see it around). My mama used to buy a big bag of individually wrapped rectangular pieces of sesame candy, which can prove dangerous. If they’re just sitting in a bowl nearby, it’s super easy to just keep unwrapping piece after piece and mindlessly popping them into your mouth like pistachios. They hold for me great memories of my past, and even my recent past. And the thing I appreciate most about sesame candy, the thing that is the most comforting to me, is that it’s always around. When I see it in someone’s home or at the grocery store or a specialty store, it reminds of a simpler time. It reminds me of summers with my family. Of laughter, Of hugs. Of what childhood might have been like for my parents growing up in Ramallah. And for those reasons, I wanted to try to hand make my own candies to share with others.

For a candy with only a few ingredients, sesame candy has a really rich, complex flavor. Toasted sesame seeds have a deep, nutty flavor that is a genuinely pleasant. You can make these candies with honey vs. sugar, and I recommend it highly. I chose to stick with sugar and water for this recipe because my attempt at using honey was a bust (THIS TIME!). I’ll revisit the recipe with honey at a later time and will share if all goes well.

This recipe is adapted from the Sahtein cookbook and worked remarkably well. My only hangup was in cutting the pieces without a) repeatedly burning myself b) making them into pleasant-looking shapes. I’ll get that down the next time around, but, rest assured, they taste great! A thermometer is required for this recipe, preferably a candy thermometer or at least a digital one. Have fun making them and please tag #yallasweets on Instagram if you give the recipe a try!
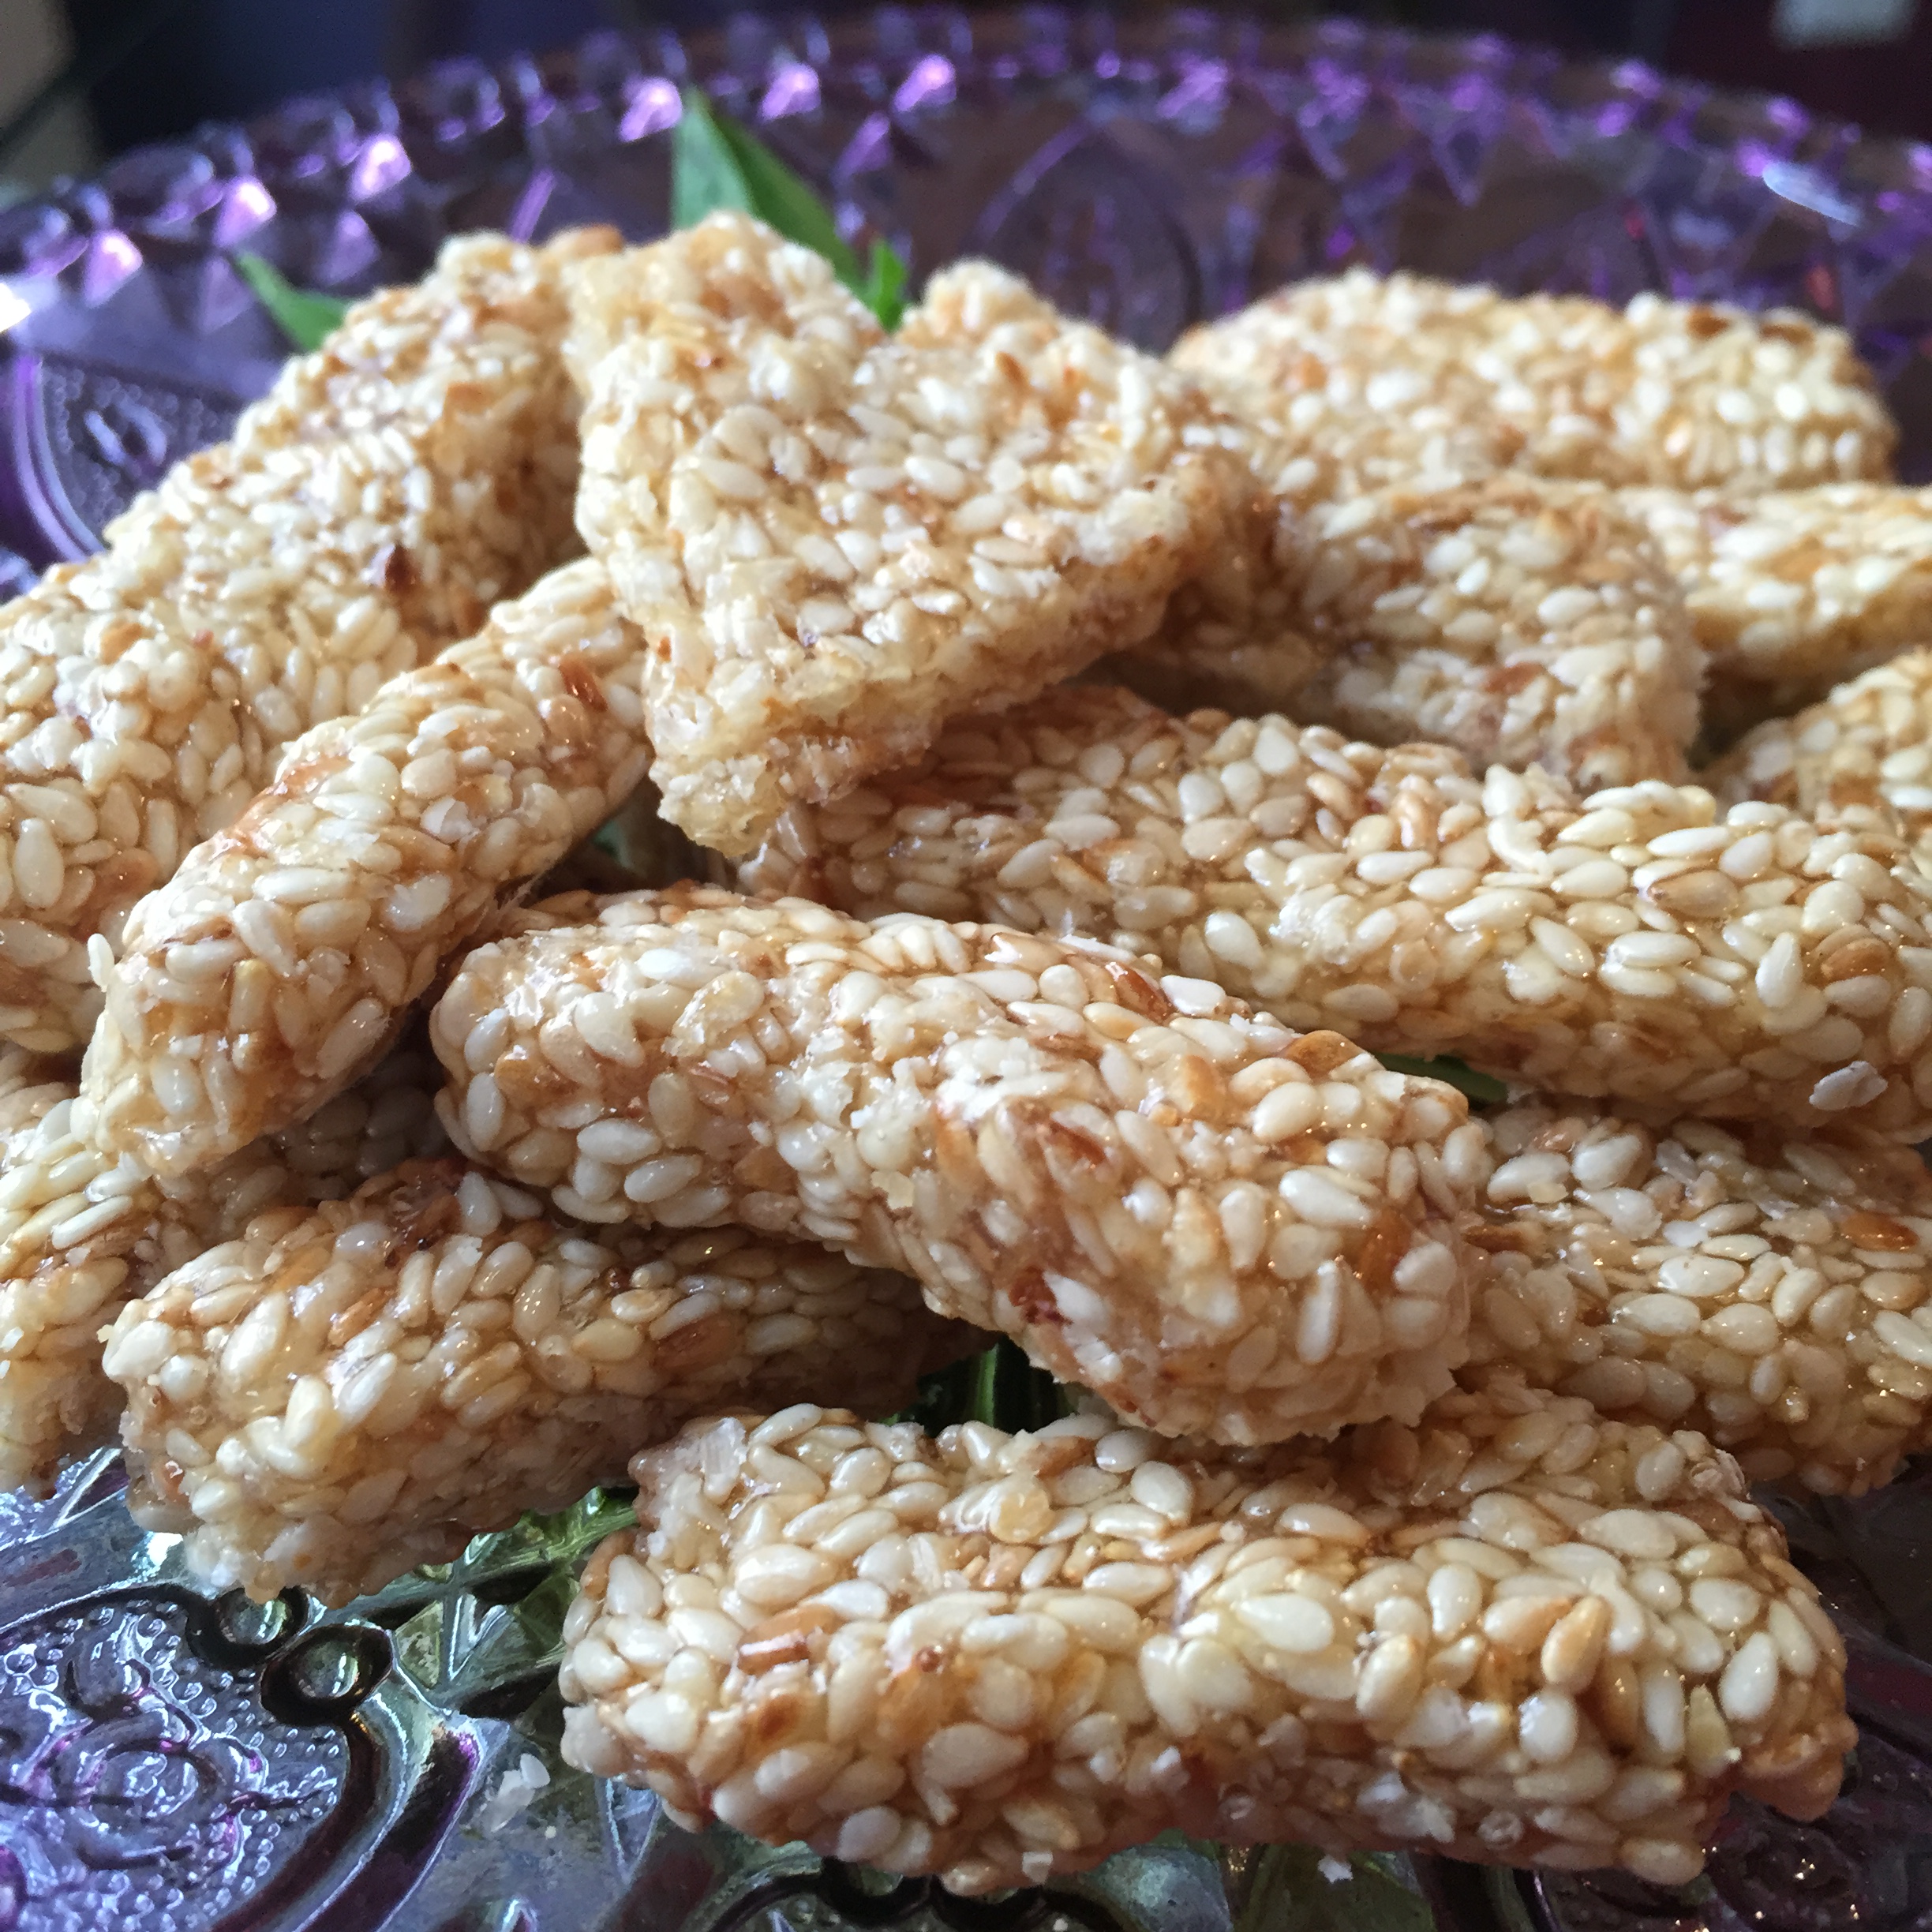
Sesame Candy

Sesame Candy

Ingredients

2 cups pure cane sugar

1 cup water

2 1/2 cups sesame seeds

1 1/2 tsp. vanilla

1 1/2 – 2 tbsp. lemon juice

Directions

Toast the sesame seeds via one of two methods:

1. You can pour the sesame seeds on to a small, ungreased baking sheet and place them in the center rack of your oven to toast for 8-10 minutes at 350°F. Check on them often to avoid burning. Every oven is different, so be mindful of the time. 

OR

2. Place the sesame seeds in a large pan and toast on the stove over a medium heat, stirring occasionally to make sure the seeds toast evenly. Do this for 3-5 minutes, and, again, be mindful of the time to avoid burning.

You want your seeds to turn a light brown color.

Once that’s done, set the sesame seeds aside.

Combine the water and sugar together and bring to a boil. Once it’s reached boiling point, add in your lemon juice.

Continue to cook, stirring the mixture consistently, until the syrup reaches a “hard crack stage” which means your syrup needs to reach 300° F. (Use your thermometer for this and be careful! This syrup is HOT!) If access to a thermometer isn’t possible, another way to test the syrup’s readiness is to place a drop of syrup into a clear cup of iced water. If the syrup drop hardens immediately inside the iced water, it’s ready.

Using a towel, remove the syrup off the heat.

Stir in your sesame seeds (do this quickly, but do it in 1/2 cup intervals) and after you’ve added about half your sesame seeds, add in the vanilla.

Pour the mixture on to a greased baking sheet (use a neutral oil like vegetable) to about 1/4 inch thickness. My strong suggestion is to place a towel under the baking sheet and use a greased spatula to spread and oven mitts/gloves to cut the mixture. You need to work while the mixture is still relatively hot, so be careful and work fast. You can use a sharp knife or a pizza cutter to cut the candy into squares, rectangles, diamonds, etc.

Remove the pieces from the baking sheet before they harden completely and place them onto a large plate or non-stick surface to let them cool. Don’t use parchment or wax paper!! Once completely cooled, you can store the candy in Tupperware or even a Ziploc bag. The candy will keep for quite awhile as long as it’s kept in a cool place (you can even freeze them!).

Note: If the mixture hardens while you’re still working, you can place the baking sheet into a slightly warm oven (around 175-185°F) for just a minute or two. This helps melt the mixture enough to continue cutting without too much added heat.

Sahtein!

Pistachio Macaroons (Recipe Included)

If you haven’t guessed by now, I REALLY adore the pistachio nut. It was one of my mama’s favorite flavors, so it was a major component in the cuisine I grew up eating. Thankfully, unlike many other foods that did not make the cut, pistachios scored big with my taste buds.

During one of my recent baking adventures, I decided to search around for cookie recipes that included pistachios. I happened upon one that was labeled as a Flourless Pistachio Cookie, but looked suspiciously like a variation on a traditional coconut macaroon to me. A happy discovery it was! Coconut and pistachios were a staple of my childhood and macaroons are one of my favorite treats.

I had never thought to make macaroons before this recipe came into my life. I know, like with everything else baking-related, there are hundreds of variations on this very simple concept; and we all know I like to keep things sweet (very!) and simple. The thing I like most about this particular recipe is that it allows the rich flavors of both the pistachio and the coconut to take center stage. There are only four ingredients in these little guys, and the other two make way for the bold flavors and textures of the star players.

The original recipe didn’t do much in the way of specifying the type of coconut or pistachios to use, so that’s where my preferences come into play. I opted to use roasted and salted pistachios because they have a greater depth of flavor. The salt gives a nice balance to the sweetness from the coconut and the powdered sugar. I probably would have added an extra tablespoon or so of egg white, but as is, this recipe is pretty solid. I also used a combo of dessicated (medium grate, unsweetened) coconut and shredded, sweetened coconut to help with texture and the level of sweetness. You can use whichever you desire, but I like things a bit on the sweeter side.

I’ve linked the original recipe above, and would be curious to hear feedback if you give them a try!

Pistachio MacaroonsPistachio Macaroons

* 1 cup of finely grated pistachio, aka pistachio powder. (I used salted, roasted pistachio nuts.)

* 3/4 cup powdered sugar (Plus about a tablespoon+ for making the pistachio powder)

* 1/2 cup dessicated coconut

* 1/2 cup sweetened shredded coconut

* 1 egg white from a large egg, room temperature

Directions

Note: I haven’t been able to find finely grated pistachio in any of the supermarkets in my area, so I make my own. Simply take about a cup of shelled pistachios and place them in a food processor. Add about a tablespoon of powdered sugar to help prevent the pistachios from forming a paste. Pulse away until you achieve the desired consistency. This takes a minute or two. You want a fine powder, though it really is up to you how fine you want to grate them. I like a little crunch so I pulse to an ALMOST fine consistency.  Set aside. (This can be done in advance and kept in an airtight container in the freezer for months. Just use when needed!)

1. In a medium metal mixing bowl, pour in your coconut and pistachio powder and mix together by hand until well combined. Add the powdered sugar and combine well. Lastly, add the large egg white (whisk the egg white slightly in a cup or small bowl before adding) and mix gently by hand until the egg white is fully incorporated and sufficiently sticky. It might not seem like the egg white is enough, but somehow it manages to bind just right. If it doesn’t,  just add small amounts of slightly whisked egg white until everything comes together.  To test, you should be able to break off about a 1/2 tablespoon to tablespoon piece and roll into a cohesive ball. If that happens, you’re good to go.

2. Place mixture in plastic wrap and chill in the fridge for at least two (2) hours.

3. Preheat your oven to 340F. I use a convection oven, so I baked them at 320F.

4. Using a large baking pan, place parchment paper down. (Don’t skip this step!)

5. Using your (clean) hands, take about 1/2 tablespoon to a full tablespoon (I wouldn’t go much larger than this) and roll them into balls. Place on baking sheet. You don’t have to worry about placing them too far apart as they don’t (shouldn’t) spread.

6. Place in the oven and bake for 7-9 minutes depending on your oven. Mine took 8-9 minutes. I like mine a little more baked, but watch for slight browning on top to know they’re good to go.

7. Take out of the oven, and let sit for a minute or two before transferring to a wire rack to cool completely. Wait until they have fully cooled before eating (they taste better this way, in my opinion).

Note: This makes roughly 15-16 macaroons, depending on how big/small you roll them out. As with most baked goods, store in an airtight container and enjoy for up to a week or so!

Sahtein!

Follow me on Instagram to get updates on what I’m baking next!


Apricot “Truffles” (Recipe Included)

Growing up, my family and I used to snack on a large, sticky sheet of something called Dried Apricot Paste (see photo below). We used to purchase it from a place named Droubi’s (a local Middle Eastern grocery store of sorts) and it has always been one of my favorite snacks. It’s essentially fruit leather, but much more substantial than those little strips you get for fifty cents from your local Whole Foods. This stuff is thick and chewy, tart and sweet, and just so addictive.

apricotThe other day, when I was chomping on square after square of this delightful paste, I started getting some ideas. Well, mostly I got the idea to look for recipes using apricots and pistachios. What did I find? About a bajillion recipes for something called an Apricot “Truffle.” I was intrigued, so I did some research and found that no two recipes for this concept were the same. Some used (a lot) of condensed milk, some used lemon, some used honey, some used different kinds of dried apricots and opted for pecans vs. pistachios. Some called for sweet vs. unsweetened coconut, while other just threw a bunch of stuff into a food processor and called it a day.

Now, I tend to get VERY overwhelmed when faced with too many options. If I can’t find one specific recipe that speaks to my sweet tooth, I find it’s best just to create my own based on the best bits and pieces I’ve found from ALL the recipes and make adjustments as I go along.

So, that is exactly what I’ve done with Apricot “Truffles.” These guys are essentially lovely little balls of apricot paste flavored with anything from lemon juice to sugar to nuts and brown sugar. I wanted my truffles to be healthier, so I kept things simple. I really like the final product this recipe yielded, but I still plan on making other variations and will be sure to post standout combinations here or on Instagram in the future! Please post a comment below or tag me on Instagram if you make them!

IMG_9900

Apricot “Truffles”

1 1/2 cups dried apricots, chopped

2 tablespoons fresh lemon juice

Zest of one small lemon

1 tablespoon honey (I used a local clover honey. This gave the truffles a significant undertone of sweet and floral flavors)

1/2 cup dessicated coconut (in other words, medium, finely shredded unsweetened coconut) – for rolling

2-3 Tablespoons finely chopped pistachios (we’re talking powder consistency almost) – for rolling

15-17 mini cupcake liners/cups/etc.

Directions

Chop up the dried apricots and put them into a food processor. Pulse until the apricots forms a thick, sticky paste.

Add the lemon zest, lemon juice, and honey and pulse until combined.

Using your hands, take about a tablespoon-sized amount of the paste and roll into a ball. You can make these whatever size you want – bigger or smaller. It’s up to you!

Take the balls and roll them in either the coconut or the pistachio (or both if you’re feeling adventurous) and put them in your mini cupcake liners.

Place them in an airtight container and put them in the fridge for about an hour before serving. You can keep these at room temp, but I find they taste better cold.

Sahtein!

(*Note – This recipe yields a very tart “truffle”. If you want yours sweeter, I’d opt to cut about a 1/2 tablespoon of the lemon juice. You can replace it with a little more honey if so desired. You can also roll these guys in any nut or topping you choose. I think they’d be good with cashews, pecans, or macadamia nuts!)